Sunday, February 17, 2008

Doom 3 for Linux

ID Software has always been a good supporter of open source, from releasing the source code for older versions of it's games (quake and doom series) to making available native versions of its games for the Linux platform. Unlike other Windows games which linux users can only hope to run using wine, ID games run natively on linux, requiring lesser resources and also provide better performance.

Doom 3 is one of the great and stunning games made by ID Software. Here's how to install it.

First of all, you would require a legitimate copy of Doom 3 purchased from ID Software.

For the next step, go here and download
doom3-linux-1.3.1.1304.x86.run


onto your desktop.

If you want to try a demo version, download the other file
doom3-linux-1.1.1286-demo.x86.run


If there is a newer version, of either files, download the newer ones.

Now run this file putting the following into a terminal.
sh ~/Desktop/doom3-linux-1.3.1.1304.x86.run

The install program will first detect your distro and system. Press Enter.


Next, it will show you the license. Press Enter.


You will be then asked if you want to accept the license in the next step. You have to accept if you want to proceed.
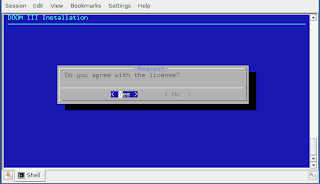

You will be asked if you want to read the readme file. Select your choice. In the next step, you have to enter the installation path. By default, the installer will install the files to '/usr/local/games/doom3'.
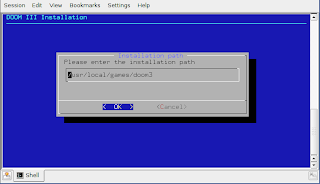

If you want to install Doom 3 for all users, you need to exit here and start the installer again with root permissions in order to write to /usr/local/games. Just put a 'sudo' before the command to start the installer as root. But if you want that all files be handled by the package management of your distro and are a single user, it would be better to install Doom 3 into your home directory.

Create a directory 'Doom3' using the command
mkdir ~/Doom3

in a second terminal. Now give the installation path as '~/Doom3'.

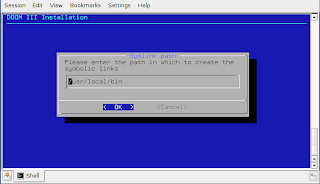
Next, you will be asked for the Symlink path. Keep the default path if you are installing as root. Else, change it to '~/bin' if you are installing as a normal user.

Next choose if you want to install Punkbuster. If you do, you will have to accept a second license agreement.
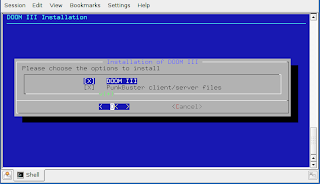

Next, say 'yes' to install startup menu entries.
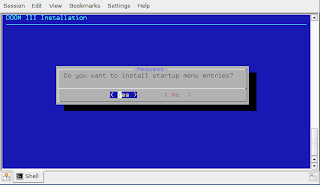

The installer will install the files and should finish successfully.
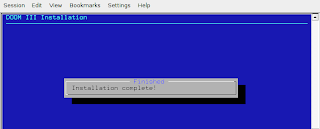

It's not over yet. There's still one last step. Now you will need to copy pak000.pk4, pak001.pk4, pak002.pk4, pak003.pk4, pak004.pk4 files from the Doom 3 Cds. They are available in '/SETUP/DATA/BASE' folder of the CDs.
CD1 -> pak002.pk4
CD2-> pak000.pk4, pak001.pk4
CD3-> pak003.pk4, pak004.pk4

These need to be copied to '/usr/local/games/doom3/base' or '~/Doom3/base' depending upon what you chose as the installation path during the setup.

Now upon restarting your computer or just your DE, you should have menu entries for Doom 3 and Doom 3 dedicated server. If you don't have them, create them, or just do Alt+F2 and run 'doom3' to start the game.

Now, Doom 3 should start without any problems and will ask for the CD key. Put in your key here.

Now you are ready to play Doom 3 on linux. If you face any problems with the installation, consult this page. Enjoy!

Thursday, February 14, 2008

Kima, a kicker monitoring applet

I have tried many different hardware monitoring applications for my linux desktop. But most of them either did not work properly or slowed down my computer or occupied my precious desktop space unnecessarily, distracting me with graphs and plots. Then I found the perfect little KDE kicker applet which gave me exactly what I wanted - a simple monitor. It's called Kima.


It can monitor various temperature, frequency and fan sources and sits inconspicuously in the kde kicker panel. It can monitor hard disk temperatures, CPU temperatures, motherboard zone temperatures, laptop battery charge, system uptime, CPU usage and also fan speeds in rpm. It even supports monitoring the GPU temperature of an Nvidia card.


Features

Supported thermal sources:

  • the Linux ACPI Thermal Zone driver. The corresponding kernel module is called thermal.
  • the thermal sources of the Linux ACPI driver for the IBM ThinkPad laptops. The corresponding kernel module is called ibm-acpi.
  • the IBM Hard Drive Active Protection System (HDAPS) driver. The corresponding kernel module is called hdaps.
  • the Omnibook Configuration Tools & Patches. The corresponding kernel module is called omnibook.
  • the iBook G4 CPU and GPU thermal zones. It may work on other Apple machines as well (please let me know).
  • the thermal sensors available through hwmon (I2C, lm_sensors, ...).
  • the CPU thermal sensor of the i8k kernel driver for Dell Inspiron and Latitude notebooks.
  • the GPU thermal sensors of nvidia-settings (provided by the nVidia GPU card driver tools)
  • the termal sensors provided by hddtemp daemon (make sure hddtemp runs on 127.0.0.1 port 7634 before kima starts)

Supported frequency sources:

  • the Linux kernel /proc/cpuinfo interface
  • the Linux kernel cpufreq subsystem

Supported fan sources:

  • the fan sensors available through hwmon (I2C, lm_sensors, ...)
  • the fan sources of the Linux ACPI driver for the IBM ThinkPad laptops. The corresponding kernel module is called ibm-acpi.
  • the fan sources of the i8k kernel driver for Dell Inspiron and Latitude notebooks.

Misc sources:

  • CPU usage source (for each CPU and/or commulative for all CPUs)
  • uptime source that displays the current system uptime
  • battery source that displays the current state of charge of your batteries

Misc:

  • cpufreqd control module to switch cpufreqd profiles via cpufreqd remote interface
Give this little applet a try if you are looking for a simple monitoring application. I am sure you will like this one. For openSUSE 10.3, you will need to add the KDE:Community repository. To start the applet in KDE, right-click on kicker and select 'Add applet'. Choose Kima from the list of applets. Packages are also available for Ubuntu, Fedora, Debian, Mandriva, Slackware, Pardus and Gentoo on Kima's website. Cheers!

Monday, February 11, 2008

Why 'sudo rm -rf /' is BAD!

Here's what happens when you run 'sudo rm -rf /'. Really an excellent example why you should not run this command on your linux machine. Thanks to alwayschooseford for this great video!

Compiz with Nvidia

For all those who are using compiz with nvidia and unable to start it using the Compiz Fusion icon and are getting the error 'No GLXFBConfig for default depth', here's what to do.

This is presently for compiz-0.7.0-5.1, fusion-icon-0.0.1_080201-2.1 and nvidia driver version 169.09. Use the latest nvidia driver if you are not using it. I presume you must have installed compiz, compiz fusion and the compiz fusion icon from the openSUSE repository. If you haven't already, then go here to find out how to install it.

Compiz with nvidia needs to first have the option 'composite' enabled in xorg.conf file. If you haven't done this, add this to your /etc/X11/xorg.conf file.
Section "Extensions"
Option "Composite" "Enable"
EndSection

Next compiz with nvidia also needs to be started with '--no-libgl-fallback' option. This is presently not taken care of in compiz fusion icon. Hence open up
/usr/lib/python2.5/site-packages/FusionIcon/data.py

with root permissions. Use 'sudo' or 'su', whichever you like and any text editor you prefer.

Find the line
compiz_args = ['--replace', '--sm-disable', '--ignore-desktop-hints', 'ccp']

Replace it with
compiz_args = ['--replace', '--sm-disable', '--ignore-desktop-hints', 'ccp', '--no-libgl-fallback']

Save the file.

Restart X to be safe and fire up compiz fusion icon and select compiz as the window manager. Compiz should start now. Hope this helps! Bye.