Wednesday, December 31, 2008

Linux and Vista Hibernation problems

Are you experiencing problems hibernating Windows Vista when you have linux installed in a dual boot setting? Does Vista log you out and show you the login/welcome screen when you try to hibernate your computer? The following may be the cause of your problem.

Vista needs the Windows partition to be marked as the active partition in order to hibernate successfully. To do this, you can use cfdisk utility available on most linux distributions. If you want to use Vista to do this, see the update at the end of the post.

For Ubuntu,
sudo apt-get install cfdisk
My openSUSE already had this installed by default. So fire up the terminal/konsole and sudo/su to cfdisk.
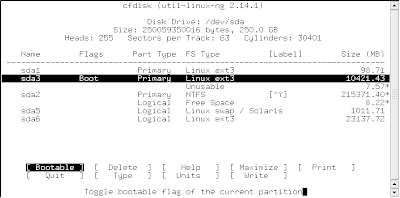

Be very careful with this. Do not make changes you do not understand as if you corrupt the partition table, you might lose all your data, along with the OSs. Be sure to backup your important files.
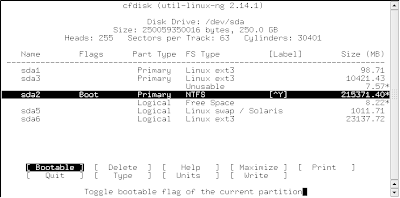

Look at the partitions and change the 'Boot' flag from the linux partition to the Windows partition. Then select 'Write' to change the partition table. cfdisk may give a message that re-reading the partition table failed. This is normal so don't worry about this.

Reboot to Vista and test hibernation.

Cheers!

Update: Much simpler and easier method using Vista, thanks to Marco:
  1. Boot to Vista
  2. Go to Start menu, right click Computer and select Manage to get the Computer Management window.
  3. Select Disk Management under the Storage category. Your partitions will be shown at the right.
  4. Right click on your Vista partition and choose "Mark Partition as Active". Your Vista partition will most probably be an NTFS partition and will be labelled 'C:'
It's that simple! Now why can't we have something like this in YaST2?

A word of caution: If you have grub setup to boot from the boot partition, this method will cause grub to be skipped while booting and Vista will get booted directly. If this happens to you, use a live cd and restore the boot flags for partitions. Set grub to boot from the master boot record to avoid this from happening.

Friday, December 26, 2008

It works! Broadcom Official Wireless driver (wl) with hidden networks!

If you are using the official Broadcom hybrid wireless driver, either manually compiled or downloaded the one available for openSUSE from Packman, here is a quick fix you can try if you are experiencing problems connecting to hidden wireless networks.

I have a Broadcom Corporation BCM4312 802.11b/g.
You can find which one you have using
/sbin/lspci | grep Broadcom

My wireless network uses WPA2 (WPA-PSK) with hidden SSID. My kernel is 2.6.27 and Network Manager 0.7. A description of the bug (or what I think is the bug) follows:

Description of the bug:

After spending long hours going through the source code for Network Manager, wpa_supplicant and the Broadcom driver itself, I have narrowed down the buggy part to the driver. The problem seems to lie in Broadcom's driver. It does not support 'scan_capa'. So to add this support, you can recompile the driver from the source RPM from Packman along with this additional patch.

diff -uNr hybrid-portsrc-x86-32_5_10_27_11/src/wl/sys/wl_iw.c hybrid-portsrc-x86-32_5_10_27_11_new/src/wl/sys/wl_iw.c
--- hybrid-portsrc-x86-32_5_10_27_11/src/wl/sys/wl_iw.c 2008-12-05 14:41:46.000000000 -0500
+++ hybrid-portsrc-x86-32_5_10_27_11_new/src/wl/sys/wl_iw.c 2008-12-26 11:34:11.000000000 -0500
@@ -580,6 +580,7 @@
range->enc_capa |= IW_ENC_CAPA_CIPHER_TKIP;
range->enc_capa |= IW_ENC_CAPA_CIPHER_CCMP;
range->enc_capa |= IW_ENC_CAPA_WPA2;
+ range->scan_capa = IW_SCAN_CAPA_ESSID;
#endif

return 0;

If you are manually compiling, just make the changes specified by the patch i.e. add this line 'range->scan_capa = IW_SCAN_CAPA_ESSID;' to 'src/wl/sys/wl_iw.c' at the specified place.

Network Manager now uses AP_SCAN 1 for the wl driver, as the driver now reports that it supports SSID scans (scan_capa 0x01). This seems to work for me and Network manager now connects easily to my hidden network without failing 10 times before connecting, like it used to do before. In fact, using AP_SCAN 2, the original wl driver should not even have connected but association is successful even though the connection fails. Network manager caches the SSID of the network and recognizes it next time for which then it uses AP_SCAN 1. Hence the driver sometimes connects successfully after a lot of unsuccessful attempts.

Please let me know if this patch works for you. If something is wrong with this patch or if you want to suggest changes or have anything to say, please feel free to leave a comment.

Thursday, December 25, 2008

Change YaST2 Fonts

Don't like the default fonts in YaST2 modules? Here's how to change them. Just use su to get root access and then use 'qtconfig' to change the fonts.


Qt Configuration with openSUSE default settings

I prefer DejaVu fonts with size 10. You can use these or any other fonts you like.

Qt Configuration after changing font and font size

See the difference between the old and new YaST2 modules! Much more better on the eyes, I think you will agree.

YaST2 Software Management Module (Before)

YaST2 Software Management Module (After)