Wednesday, September 2, 2026

Viewing Windows PCs on network when using ufw firewall in Kubuntu 26.04

For anyone having a problem with Windows shares not showing up in the network when using samba with the ufw firewall enabled, it seems an additional source port filter rule for wsdd is required. Refer to the discussion at firewalld here. Since ufw app rules only allow simple filters, this extra rule needs to be manually applied as follows.
sudo ufw allow proto udp from any port 3702 to any

 Note: Ensure your machine is on a trusted network.

 I am assuming filter rules for samba and wsdd have already been applied. If not, apply them with the following commands.

sudo ufw allow samba
sudo ufw allow wsdd

Restart the firewall with 'sudo ufw reload' and windows PCs in the network should become visible in Dolphin. Hope this helps!

Sunday, September 27, 2009

Upcoming in zypp.. Download all, then install!

YaST and zypper will finally have the ability to download all packages first and then install (commit post)! No more broken packages because of an aborted download due to connection issues!


 'Download in Advance' in action!


Notice the slight glitch in the 'Actions performed' List where 'Downloading XXX' line gets repeated

This was a much needed and essential feature which has finally been implemented. Though zypper will be getting configurable command line options for this soon, YaST can be setup by editing /etc/zypp/zypp.conf.

Here's the relevant part to be edited with 4 options available. 
##
## Commit download policy to use as default.
##
##  DownloadOnly,       Just download all packages to the local cache.
##                      Do not install. Implies a dry-run.
##
##  DownloadInAdvance,  First download all packages to the local cache.
##                      Then start to install.
##
##  DownloadInHeaps,    Similar to DownloadInAdvance, but try to split
##                      the transaction into heaps, where at the end of
##                      each heap a consistent system state is reached.
##
##  DownloadAsNeeded    Alternating download and install. Packages are
##                      cached just to avid CD/DVD hopping. This is the
##                      traditional behaviour.
##
##               If a value is not set, empty or unknown, we pick
##                      some save default.
##
commit.downloadMode = DownloadInAdvance


Now 'download in advance' policy should really be made default for 11.2. Right now it is 'download as needed'.

YaST also has configurable behavior for closing after installation. This is configurable via sysconfig editor. Three options: Close (closes after installation/removal finishes), Summary (which gives a nice summary of things that were done) and Restart (which sends you back to the default startup screen with search tab active).


Again 'Close' is still the default which is the worst possible option to keep as default. This should be changed to 'Summary' which should be more convenient for new users and which they can change later if they want, once they become more familiar with openSUSE.


A small rant about the Summary Screen: There always seems to be a difficulty with finding the correct names for buttons in YaST modules. Button names should be very clear regarding what the buttons are going to do. In the summary screen, there are two buttons "Back" and "Finish". Now an average user who is mostly familiar with the "Back" and "Forward" buttons used in a browser is most likely to think that the back button will send him to the previous page, which was the "Perform Installation" page with the flashing download/install progress bars. Hence, the user will click "Finish" which sounds more appropriate, with the effect that the window very rudely disappears. The current button names are more appropriate from the point of view of the installation workflow but are not good from the user's point of view. Some suggestions would be to rename "Back" as "OK" and the "Finish" button as "Quit". Also it would be better if the OK button was moved to the extreme right corner since users instinctively click corner buttons. The OK button also needs to be made default instead of Quit. Users like to click shiny highlighted buttons. Abort buttons should also be changed to Cancel and where ever  they are not required, they should be removed or made invisible instead of just disabling them.

Thanks to the devs again for the new features. Their efforts are commendable. One more step in catching upto the debian based distributions, though openSUSE has superior package management features of its own too. Now come the next essential features: Resuming downloads, downloading multiple packages in parallel and orphaned package removal!

Wednesday, January 14, 2009

Vpnc and Kde3 KNetworkManager in openSUSE 11.1

I was trying to connect to a VPN network today but network manager failed to connect. A dig through Network Manager's logs revealed an error message 'property 'Disable NAT Traversal' invalid or not supported'.

I googled and found a similar bug report in Ubuntu. It seems that at some point, the option of 'Disable NAT Traversal' got removed from vpnc but knetworkmanager never got updated. As a consequence, the connection fails.

The workaround described is simple and works for me. Just edit .kde/share/config/knetworkmanagerrc manually. Remove the lines:
<string>Disable NAT Traversal</string>\n <string>none</string>\n </entry>\n <entry>\n <string>Enable Single DES</string>\n <string>no</string>\n </entry>\n <entry>\n

Restart networkmanager (sudo /sbin/rcnetwork restart) and knetworkmanager, and try to connect again. This time, the connection should be successful.

I recall a similar bug report filed in bugzilla for opensuse but I am not able to find it now. The bug, if I remember correctly, has being fixed in svn but the fix still hasn't been backported or provided in an update. Till then, this workaround should help you to connect to your vpn network.

Saturday, January 10, 2009

Package Search Module in YaST2

I came to know from this blog that there is a YaST module for searching software in openSUSE package repositories and Packman! Very cool indeed!


But it seems that the devs decided to keep this module invisible in YaST2 even though its there in openSUSE 11.1. Right now, the module can be launched from the command line as follows:

/sbin/yast2 webpin_package_search

But since I find this module to be incredibly useful, I added it to YaST. Here's how to do it. Just open your favorite editor (gedit/kwrite/kate) and paste the following lines in it.

[Desktop Entry]
X-SuSE-translate=true
X-SuSE-DocTeamID=ycc_webpin_package_search
Type=Application
Categories=Settings;System;Qt;X-SuSE-YaST;X-SuSE-YaST-Software;

X-KDE-ModuleType=Library
X-KDE-RootOnly=true
X-KDE-HasReadOnlyMode=true
X-KDE-Library=yast2
X-SuSE-YaST-Call=webpin_package_search

X-SuSE-YaST-Group=Software
X-SuSE-YaST-Argument=
X-SuSE-YaST-RootOnly=true
X-SuSE-YaST-AutoInst=
X-SuSE-YaST-Geometry=
X-SuSE-YaST-SortKey=
X-SuSE-YaST-AutoInstResource=

Icon=yast-sw_source
Exec=/sbin/yast2 webpin_package_search

Name=Software Search
GenericName=Search for software in openSUSE package repositories
X-KDE-SubstituteUID=true
StartupNotify=true

Save the file as webpin_package_search.desktop and move it to /usr/share/applications/YaST2 folder. Start YaST2 and you should now see a module called "Software Search" in YaST2.


Launch it to test if the module starts correctly. You now have the package search module easily accessible from YaST.

The devs also mention in the article comments that they are working on an application uninstaller which should do something equivalent to 'apt-get autoremove' in Debian and Ubuntu. Hopefully we should be able to see this in the next release, openSUSE 11.2. Even better would be if the devs can also implement an add/remove software module like the one available in Ubuntu. But I imagine the application uninstaller itself involves a lot of work, so even if they can get that into the next release, it would be really great!

Hope you enjoy using the package search module in YaST! Cheers!

Monday, January 5, 2009

Kdm3 in openSUSE 11.1

The KDE3 desktop installation for openSUSE 11.1 installs, by default, kdm4 or the kde display manager from the kde4 desktop.

Anyone who uses kde3 and finds the switch user options for 'start a new session' and 'Lock current and start new session' particularly useful, installing kdm3 will give you these options back.

For getting kdm3 back, install kdebase3-kdm.

sudo zypper in kdebase3-kdm


Then goto YaST2->System->/etc/sysconfig Editor.

In the tree listing on the left, go into Desktop->Display manager->DISPLAYMANAGER and change its setting from 'kdm4' to 'kdm' (Note: Don't use kdm3).

Save the changes (Click OK Button) and reboot. Kdm3 will now be used instead of Kdm4.

And on a side note, just noticed a lot of new visitors coming from tuxmachines.org. Welcome to my blog everyone!

Sunday, January 4, 2009

Kima in openSUSE 11.1

Just realized that openSUSE 11.1 does not have kima packaged in the KDE community repository. Going through the build service repository, it seems that the build fails on suse 11.1 because of a few additional rpm checks which the build service has added.

A little bit of digging into the new checks and a small patch to the spec file and voila! Kima builds successfully for 11.1!

Get your kima from my home project repository here.

YaST Software Management module in openSUSE 11.1

For anyone who does not like automatically closing behavior of YaST Software Management module (or sw_single) in openSUSE 11.1, I have made a modified package (yast2-packager) which does not close automatically. Get it from my build service home project repository here.

I do not like the self closing behavior myself. No other package manager in any distribution does this. Even add/remove programs in Windows does not do this either. In 10.3, YaST used to ask if we want to install more packages or not, using a popup window. But as people find this popup irritating, the developers removed it. But I don't think whoever who wanted this also wanted the module to automatically close either. In terms of the user, I think the user will find both these things irritating: 1) Popups and 2) Windows which abruptly close without warning. A proper design would be where the number of clicks a user has to perform is least without experiencing the two behaviors described above. Now consider three use cases: 1) Popup removed and window closes automatically 2) Popup removed but the module does not quit. 3) Popup present.

For the first case, if a user does not want to do any futher software changes -> 0 clicks, or if YaST is open too, 1 click to close YaST. Let's give an average of 0.5 clicks.
If user want to make software changes -> if YaST is open, click software module (1 click); or go to openSUSE kickoff menu and click 'Install Software' (1 click); or go to openSUSE menu and click YaST, then click Software Management (2 clicks); All these can increase by one click if the user has the traditional KDE menu or the 'open on hover' feature does not work correctly for the buttons in the kickoff menu. Lets give this case an average of 1.25 clicks. (Note that making the user go through the menu again is not good design).

For the second use case, if a user does not want to do any further software changes-> 1 click to close the module, 2 clicks to close both the module and YaST if open. Let's give this one an average of 1.5 clicks.
If user wants to make software changes-> 0 clicks (module is already open).

For the third use case, if a user wants to make any software changes, click yes when popup is displayed (1 click).
If user does not want to make any changes, click no when popup is displayed (1 click).

Now, lets assign a fixed number of clicks (say 1 click each) to both popup and a self-closing window. So the first case will now have 1 click contribution from the abruptly closing window, the second case will have no contribution and the third case will have 1 click contribution from the popup (Here we are not counting the window closing as the user should be expecting the window to close when he says no).

On tabulating and averaging the clicks for the three cases, you can see that the second case has the lowest number of clicks.


Case 1 Case 2 Case 3
No software changes0.51.51
Software changes1.2501
Popups/closing window101
Average0.920.51


Some more observations: If for the first case, we reduce the clicks for 'more software changes' condition to 1, the average no of clicks will be 0.83 which is still larger than 0.5 for the second case. Further, if we reduce the number of clicks for software changes for the first case and then assume that the user gets accustomed to the window closing on its own, then making the contribution from it zero, the average number of clicks then matches the second case.

Some people may argue that they need something to tell them that software installation was successful or not at the end of the installation process. But then, if something does go wrong, the module does pop up more notifications/warnings than needed already!

In any case, I feel that its best to trust the developers to make the appropriate decision. Since openSUSE is open source free software, we can always make our own customized packages. Feel free to use the package in my repository but remember that its at your own risk!

Wednesday, December 31, 2008

Linux and Vista Hibernation problems

Are you experiencing problems hibernating Windows Vista when you have linux installed in a dual boot setting? Does Vista log you out and show you the login/welcome screen when you try to hibernate your computer? The following may be the cause of your problem.

Vista needs the Windows partition to be marked as the active partition in order to hibernate successfully. To do this, you can use cfdisk utility available on most linux distributions. If you want to use Vista to do this, see the update at the end of the post.

For Ubuntu,
sudo apt-get install cfdisk
My openSUSE already had this installed by default. So fire up the terminal/konsole and sudo/su to cfdisk.


Be very careful with this. Do not make changes you do not understand as if you corrupt the partition table, you might lose all your data, along with the OSs. Be sure to backup your important files.


Look at the partitions and change the 'Boot' flag from the linux partition to the Windows partition. Then select 'Write' to change the partition table. cfdisk may give a message that re-reading the partition table failed. This is normal so don't worry about this.

Reboot to Vista and test hibernation.

Cheers!

Update: Much simpler and easier method using Vista, thanks to Marco:
  1. Boot to Vista
  2. Go to Start menu, right click Computer and select Manage to get the Computer Management window.
  3. Select Disk Management under the Storage category. Your partitions will be shown at the right.
  4. Right click on your Vista partition and choose "Mark Partition as Active". Your Vista partition will most probably be an NTFS partition and will be labelled 'C:'
It's that simple! Now why can't we have something like this in YaST2?

A word of caution: If you have grub setup to boot from the boot partition, this method will cause grub to be skipped while booting and Vista will get booted directly. If this happens to you, use a live cd and restore the boot flags for partitions. Set grub to boot from the master boot record to avoid this from happening.

Friday, December 26, 2008

It works! Broadcom Official Wireless driver (wl) with hidden networks!

If you are using the official Broadcom hybrid wireless driver, either manually compiled or downloaded the one available for openSUSE from Packman, here is a quick fix you can try if you are experiencing problems connecting to hidden wireless networks.

I have a Broadcom Corporation BCM4312 802.11b/g.
You can find which one you have using
/sbin/lspci | grep Broadcom

My wireless network uses WPA2 (WPA-PSK) with hidden SSID. My kernel is 2.6.27 and Network Manager 0.7. A description of the bug (or what I think is the bug) follows:

Description of the bug:

After spending long hours going through the source code for Network Manager, wpa_supplicant and the Broadcom driver itself, I have narrowed down the buggy part to the driver. The problem seems to lie in Broadcom's driver. It does not support 'scan_capa'. So to add this support, you can recompile the driver from the source RPM from Packman along with this additional patch.

diff -uNr hybrid-portsrc-x86-32_5_10_27_11/src/wl/sys/wl_iw.c hybrid-portsrc-x86-32_5_10_27_11_new/src/wl/sys/wl_iw.c
--- hybrid-portsrc-x86-32_5_10_27_11/src/wl/sys/wl_iw.c 2008-12-05 14:41:46.000000000 -0500
+++ hybrid-portsrc-x86-32_5_10_27_11_new/src/wl/sys/wl_iw.c 2008-12-26 11:34:11.000000000 -0500
@@ -580,6 +580,7 @@
range->enc_capa |= IW_ENC_CAPA_CIPHER_TKIP;
range->enc_capa |= IW_ENC_CAPA_CIPHER_CCMP;
range->enc_capa |= IW_ENC_CAPA_WPA2;
+ range->scan_capa = IW_SCAN_CAPA_ESSID;
#endif

return 0;

If you are manually compiling, just make the changes specified by the patch i.e. add this line 'range->scan_capa = IW_SCAN_CAPA_ESSID;' to 'src/wl/sys/wl_iw.c' at the specified place.

Network Manager now uses AP_SCAN 1 for the wl driver, as the driver now reports that it supports SSID scans (scan_capa 0x01). This seems to work for me and Network manager now connects easily to my hidden network without failing 10 times before connecting, like it used to do before. In fact, using AP_SCAN 2, the original wl driver should not even have connected but association is successful even though the connection fails. Network manager caches the SSID of the network and recognizes it next time for which then it uses AP_SCAN 1. Hence the driver sometimes connects successfully after a lot of unsuccessful attempts.

Please let me know if this patch works for you. If something is wrong with this patch or if you want to suggest changes or have anything to say, please feel free to leave a comment.

Thursday, December 25, 2008

Change YaST2 Fonts

Don't like the default fonts in YaST2 modules? Here's how to change them. Just use su to get root access and then use 'qtconfig' to change the fonts.


Qt Configuration with openSUSE default settings

I prefer DejaVu fonts with size 10. You can use these or any other fonts you like.

Qt Configuration after changing font and font size

See the difference between the old and new YaST2 modules! Much more better on the eyes, I think you will agree.

YaST2 Software Management Module (Before)

YaST2 Software Management Module (After)

Wednesday, November 19, 2008

The best looking XP theme for linux/gnome ever..

Among all the XP themes for gnome I have seen so far, this theme really looks very close to Windows XP. Plus it’s very easy to install than other themes. Just unpack the theme and run the “InstallXpGnome.sh” file.

Kudos to whoever who made this theme. It must have taken a good amount of work to get the theme and installer properly finished and working.

Although some people might just ask ‘Why?’, themes like this help people who are new to Linux get adjusted to the new user interface easily. This theme makes them feel comfortable since it resembles an environment which they are already used to (namely Windows).

Beware: This theme does not have an uninstaller! You have to do it manually!

Tip: Ubuntu 8.10 (Intrepid Ibex) users have the option of switching to the guest user account rather than their normal account in order to try this theme and see if they like it or not..

Saturday, June 28, 2008

PDF Printer on openSUSE

PDF Printer is really a necessary feature that should be included by default in openSUSE. But since it is not, we shall install it quickly and effortlessly.

  1. Go to openSUSE Software Search. Search for 'cups-pdf'. Make sure the proper version of openSUSE is selected before you start searching.
  2. Choose the latest version from the results. I chose the one from gcoste's home repository. But you can choose any other too. You can install the rpm by using the 1-click install.
  3. Next we need to add the PDF Printer to cups. So open up CUPS Administration by clicking this link (http://localhost:631/admin).
  4. If cups has already not found the new printer, click 'Find New Printers' under the 'Printers' category. CUPS will have now detected the 'Virtual PDF Printer'. In the next screen, leave the 'Make' section blank. Fill up the 'Provide a PPD File' section by browsing to '/usr/share/cups/model/' directory and selecting the PPD file that came with the cups-pdf rpm. You can find this file by using
    rpm -ql cups-pdf
    The file with the .ppd extension in the list is the one you require to select here. Next, click the 'add printer' button and the pdf printer will be added to cups.
  5. Next we need to configure the default directory in which the created pdf files will be stored. This is by default '/var/spool/cups-pdf/${USER}'. Hence, to store the pdf files onto the desktop, edit '/etc/cups/cups-pdf.conf' file. Change the line
    #Out /var/spool/cups-pdf/${USER}
    to
    Out /home/${USER}/Desktop
There! Now you have successfully installed PDF printer in openSUSE. Try a few pdf prints to verify that the pdf printer is working properly.

For more details including about how to compile pdf printer from source, refer the opensuse documentation here.

Sunday, June 22, 2008

openSUSE 11.0 Released!

After a long wait, the new openSUSE 11.0 has been released! With the fastest package management to date, and the best stable KDE 4 distro available yet, openSUSE is definitely worth the download. Get yours today! And have a lot of fun!

Sunday, February 17, 2008

Doom 3 for Linux

ID Software has always been a good supporter of open source, from releasing the source code for older versions of it's games (quake and doom series) to making available native versions of its games for the Linux platform. Unlike other Windows games which linux users can only hope to run using wine, ID games run natively on linux, requiring lesser resources and also provide better performance.

Doom 3 is one of the great and stunning games made by ID Software. Here's how to install it.

First of all, you would require a legitimate copy of Doom 3 purchased from ID Software.

For the next step, go here and download
doom3-linux-1.3.1.1304.x86.run


onto your desktop.

If you want to try a demo version, download the other file
doom3-linux-1.1.1286-demo.x86.run


If there is a newer version, of either files, download the newer ones.

Now run this file putting the following into a terminal.
sh ~/Desktop/doom3-linux-1.3.1.1304.x86.run

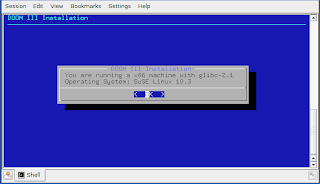
The install program will first detect your distro and system. Press Enter.

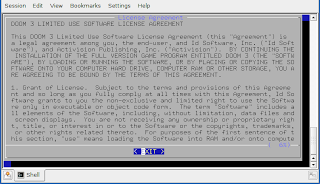
Next, it will show you the license. Press Enter.

You will be then asked if you want to accept the license in the next step. You have to accept if you want to proceed.
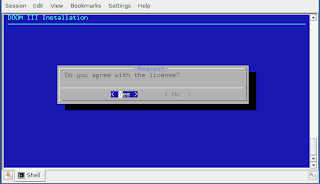

You will be asked if you want to read the readme file. Select your choice. In the next step, you have to enter the installation path. By default, the installer will install the files to '/usr/local/games/doom3'.
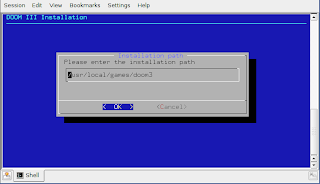

If you want to install Doom 3 for all users, you need to exit here and start the installer again with root permissions in order to write to /usr/local/games. Just put a 'sudo' before the command to start the installer as root. But if you want that all files be handled by the package management of your distro and are a single user, it would be better to install Doom 3 into your home directory.

Create a directory 'Doom3' using the command
mkdir ~/Doom3

in a second terminal. Now give the installation path as '~/Doom3'.

Next, you will be asked for the Symlink path. Keep the default path if you are installing as root. Else, change it to '~/bin' if you are installing as a normal user.
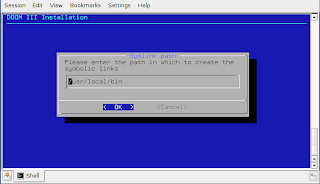

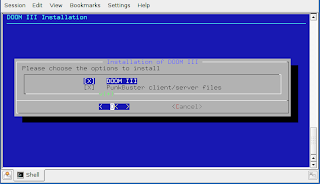
Next choose if you want to install Punkbuster. If you do, you will have to accept a second license agreement.

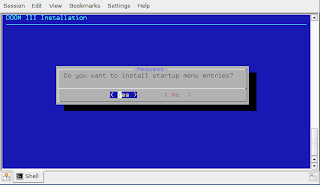
Next, say 'yes' to install startup menu entries.

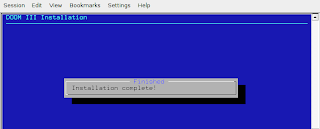
The installer will install the files and should finish successfully.

It's not over yet. There's still one last step. Now you will need to copy pak000.pk4, pak001.pk4, pak002.pk4, pak003.pk4, pak004.pk4 files from the Doom 3 Cds. They are available in '/SETUP/DATA/BASE' folder of the CDs.
CD1 -> pak002.pk4
CD2-> pak000.pk4, pak001.pk4
CD3-> pak003.pk4, pak004.pk4

These need to be copied to '/usr/local/games/doom3/base' or '~/Doom3/base' depending upon what you chose as the installation path during the setup.

Now upon restarting your computer or just your DE, you should have menu entries for Doom 3 and Doom 3 dedicated server. If you don't have them, create them, or just do Alt+F2 and run 'doom3' to start the game.

Now, Doom 3 should start without any problems and will ask for the CD key. Put in your key here.

Now you are ready to play Doom 3 on linux. If you face any problems with the installation, consult this page. Enjoy!

Thursday, February 14, 2008

Kima, a kicker monitoring applet

I have tried many different hardware monitoring applications for my linux desktop. But most of them either did not work properly or slowed down my computer or occupied my precious desktop space unnecessarily, distracting me with graphs and plots. Then I found the perfect little KDE kicker applet which gave me exactly what I wanted - a simple monitor. It's called Kima.


It can monitor various temperature, frequency and fan sources and sits inconspicuously in the kde kicker panel. It can monitor hard disk temperatures, CPU temperatures, motherboard zone temperatures, laptop battery charge, system uptime, CPU usage and also fan speeds in rpm. It even supports monitoring the GPU temperature of an Nvidia card.


Features

Supported thermal sources:

  • the Linux ACPI Thermal Zone driver. The corresponding kernel module is called thermal.
  • the thermal sources of the Linux ACPI driver for the IBM ThinkPad laptops. The corresponding kernel module is called ibm-acpi.
  • the IBM Hard Drive Active Protection System (HDAPS) driver. The corresponding kernel module is called hdaps.
  • the Omnibook Configuration Tools & Patches. The corresponding kernel module is called omnibook.
  • the iBook G4 CPU and GPU thermal zones. It may work on other Apple machines as well (please let me know).
  • the thermal sensors available through hwmon (I2C, lm_sensors, ...).
  • the CPU thermal sensor of the i8k kernel driver for Dell Inspiron and Latitude notebooks.
  • the GPU thermal sensors of nvidia-settings (provided by the nVidia GPU card driver tools)
  • the termal sensors provided by hddtemp daemon (make sure hddtemp runs on 127.0.0.1 port 7634 before kima starts)

Supported frequency sources:

  • the Linux kernel /proc/cpuinfo interface
  • the Linux kernel cpufreq subsystem

Supported fan sources:

  • the fan sensors available through hwmon (I2C, lm_sensors, ...)
  • the fan sources of the Linux ACPI driver for the IBM ThinkPad laptops. The corresponding kernel module is called ibm-acpi.
  • the fan sources of the i8k kernel driver for Dell Inspiron and Latitude notebooks.

Misc sources:

  • CPU usage source (for each CPU and/or commulative for all CPUs)
  • uptime source that displays the current system uptime
  • battery source that displays the current state of charge of your batteries

Misc:

  • cpufreqd control module to switch cpufreqd profiles via cpufreqd remote interface
Give this little applet a try if you are looking for a simple monitoring application. I am sure you will like this one. For openSUSE 10.3, you will need to add the KDE:Community repository. To start the applet in KDE, right-click on kicker and select 'Add applet'. Choose Kima from the list of applets. Packages are also available for Ubuntu, Fedora, Debian, Mandriva, Slackware, Pardus and Gentoo on Kima's website. Cheers!

Monday, February 11, 2008

Why 'sudo rm -rf /' is BAD!

Here's what happens when you run 'sudo rm -rf /'. Really an excellent example why you should not run this command on your linux machine. Thanks to alwayschooseford for this great video!

Compiz with Nvidia

For all those who are using compiz with nvidia and unable to start it using the Compiz Fusion icon and are getting the error 'No GLXFBConfig for default depth', here's what to do.

This is presently for compiz-0.7.0-5.1, fusion-icon-0.0.1_080201-2.1 and nvidia driver version 169.09. Use the latest nvidia driver if you are not using it. I presume you must have installed compiz, compiz fusion and the compiz fusion icon from the openSUSE repository. If you haven't already, then go here to find out how to install it.

Compiz with nvidia needs to first have the option 'composite' enabled in xorg.conf file. If you haven't done this, add this to your /etc/X11/xorg.conf file.
Section "Extensions"
Option "Composite" "Enable"
EndSection

Next compiz with nvidia also needs to be started with '--no-libgl-fallback' option. This is presently not taken care of in compiz fusion icon. Hence open up
/usr/lib/python2.5/site-packages/FusionIcon/data.py

with root permissions. Use 'sudo' or 'su', whichever you like and any text editor you prefer.

Find the line
compiz_args = ['--replace', '--sm-disable', '--ignore-desktop-hints', 'ccp']

Replace it with
compiz_args = ['--replace', '--sm-disable', '--ignore-desktop-hints', 'ccp', '--no-libgl-fallback']

Save the file.

Restart X to be safe and fire up compiz fusion icon and select compiz as the window manager. Compiz should start now. Hope this helps! Bye.

Monday, May 21, 2007

Bootsplash in openSUSE

openSUSE has one of the most gorgeous looking bootsplash than most other Linux distros out there. In all my previous installs of openSUSE, for some mysterious reason, the bootsplash never showed up during boot. This was mainly due to the fact that the screen resolution for the splash was not set properly during install. In Yast2, the bootloader module does not give you options to choose the appropriate resolution from, as can be seen below.


You have to manually enter the corresponding code for your screen resolution. In my case, it was 794. Remember that bootsplash currently works only up to 16bit. If bootsplash still does not work, choose a lesser resolution and see if it works. To get the appropriate vga mode for your screen resolution, refer the table below:


Screen Size 640x480 800x600 1024x768 1280x1024
Colors


256 (8 bit)
769 771 773 775
32000 (15 bit)
784 787 790 793
65000 (16 bit)
785 788 791 794
16.7M (24 bit)
786 789 792 795

Note: If the above does not work, also try running additionally with root permissions
mkinitrd -s screen_size

where 'screen_size' will be 1280x1024 for an LCD monitor with 1280x1024 as the maximum screen resolution.

Wednesday, May 9, 2007

How to install Internet Explorer in Linux

Although using Firefox is preferable than using IE, sometimes you really require IE to open a page which is IE only. This can be problematic especially if you are running Linux. Also, if you are a web developer and using Linux, installing IE can prove to be be useful.

Internet Explorer can be used in Linux using Wine. Wine can be easily obtained on any Linux distribution easily using the appropriate repository or it may even come pre-installed. But the difficult part is to get IE installed and working properly. To get the latest wine package for openSUSE 10.2, just add this repo as a source to Yast2 and then install wine.

Next, to install IE, use IEs4Linux. This provides a very convenient way to install IE and automatically downloads all required components. It also provides you with an icon on the desktop for launching IE. I have found it to be bug-free and the installed IE has worked flawlessly till now. Although you should be aware that the installed IE is as insecure as actual IE itself and so you would be better off using Firefox and use IE only when absolutely required.

Tuesday, May 8, 2007

How to change MAC address in openSUSE 10.2

Yast2 is a great tool in openSUSE for configuring all your network settings but one thing it lacks is the option to change the MAC address of the network card. This option is available in Windows so I see no reason why it should not be available in Yast.

Luckily, there is an alternate way to change your MAC address. I am assuming that you would want to change the MAC address on every boot. Otherwise 'ifconfig' is always available to change the MAC address.

To change the MAC address automatically on every boot, just create a file named 'rclocal' in /etc/init.d folder. Enter the following in this file:


#! /bin/sh

## This script simulates redhat's rc.local (Add commands at the end)

### BEGIN INIT INFO
# Provides: rclocal
# Required-Start: $local_fs $remote_fs $network
# X-UnitedLinux-Should-Start: $ALL
# Required-Stop:
# X-UnitedLinux-Should-Stop:
# Default-Start: 3 5
# Default-Stop: 0 1 2 6
# Short-Description: Simulates rc.local
# Description: Simulates redhat's rc.local: contains
# commands to execute after system has booted (all services are already
# available)
### END INIT INFO

## Execute ony when service is started
case "$1" in
start)
## commands will be executed
;;
*)
exit 0
;;
esac

# vvvvv Add your commands bellow this line vvvvv
/sbin/ifconfig eth0 hw ether 'Your New MAC address here'


Enter the MAC address that you want in the last line. After this, open up Yast2 and goto System-> System Services (Runlevel). In the list of services, select rclocal and enable it.


Save the changes. Reboot your computer. On reboot, the MAC address of your network card should now have been changed to the new one.

Note that this file can also be used like redhat's rc.local and so you can also add other stuff here.

Hope this has been useful! Please let me know if I have written anything incorrectly. Bye!